A complete visual walkthrough of Neuron Wallet on Nervos CKB — from generating your first seed to earning compensation in the Nervos DAO and claiming unlocked cells. Every step below is a real screen from the desktop app with an explanation of what it does and why it matters.
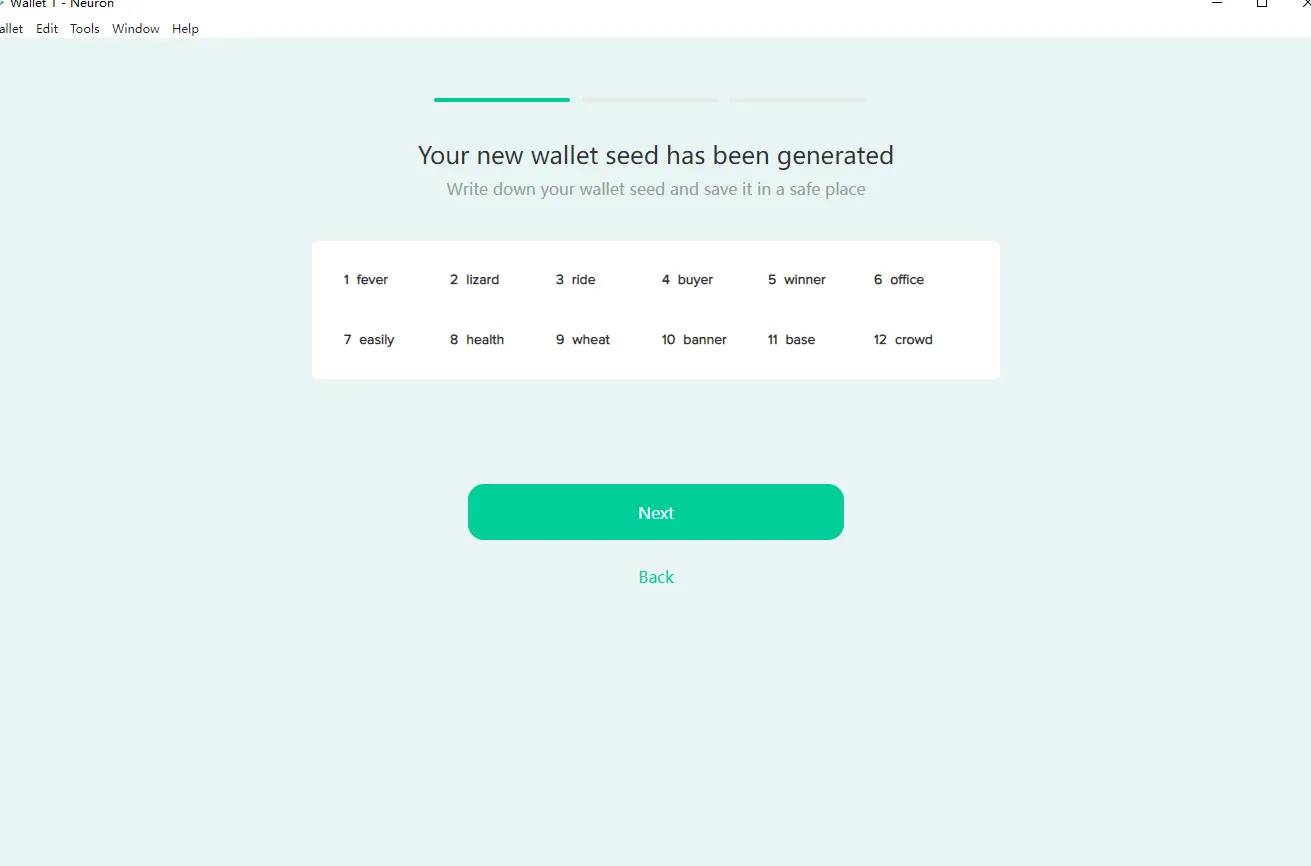
After the first launch, Neuron generates a brand new wallet locally on your machine and shows you a 12-word recovery seed. This seed — not the app, not any server — is what actually controls your CKB.
Write the 12 words down on paper in the exact order shown; never store them in a screenshot, cloud note or password manager sync.
The progress bar at the top shows the three setup stages: generate seed, confirm seed, set a wallet password.
The confirmation screen asks you to re-enter a subset of the words, so keep your paper backup at hand before clicking Next.
The wallet password encrypts the keystore on this computer and is required for every outgoing transaction. It does not replace the seed.
Warning:Anyone who reads these 12 words can move your funds from any device. Neuron cannot recover a lost seed — there is no support line, no reset, no backup server.
02
Read the Overview and wait for full sync
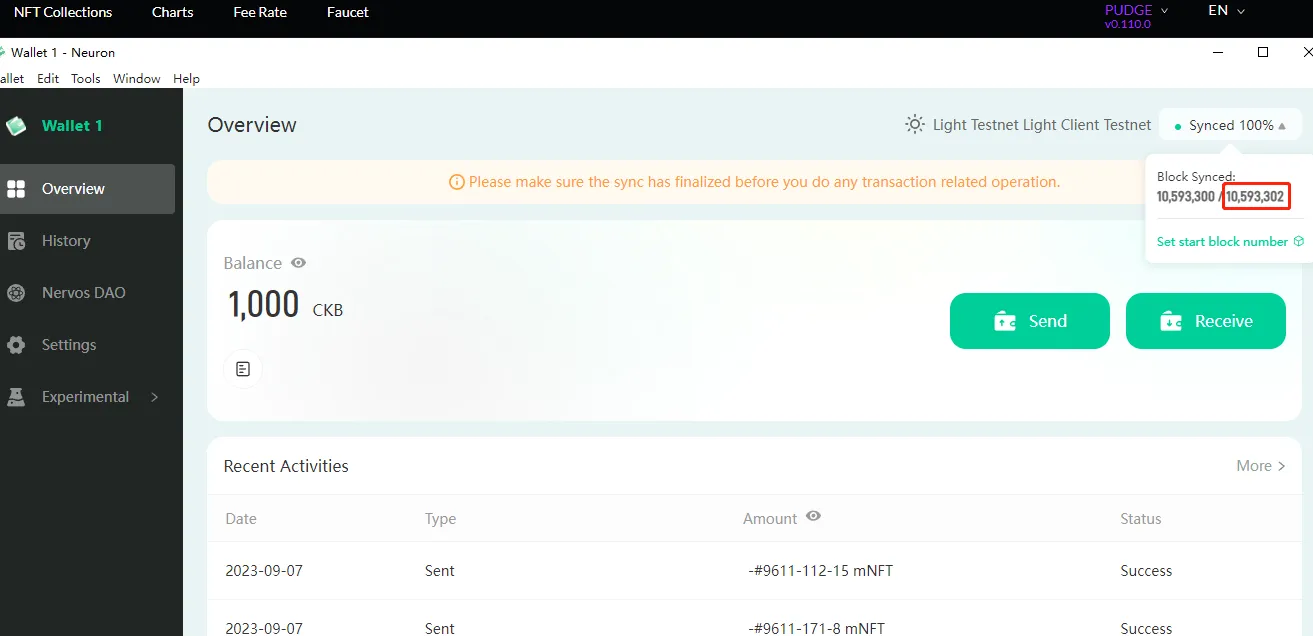
The Overview is your home screen: total balance in CKB, the sync indicator, and the latest transactions. Neuron talks to a CKB node directly, so what you see is chain data, not an API cache.
Daily use · Step 02 — Neuron Wallet Overview screen with balance, sync status and recent activity
The sync badge in the top-right shows the synced block against the network tip. Hover it to see both numbers and to set a custom start block for faster light-client sync.
The network label (Mainnet, Testnet or Light Client) tells you which chain you are on — always confirm before sending real value.
Send and Receive open the transfer flows; Receive shows your address and QR code.
Recent Activities lists the last transfers with date, type, amount and status; More opens the full History page.
Note:Wait for 100% sync before sending or using the DAO. A partially synced wallet may show an outdated balance and build an invalid transaction.
03
Send CKB and choose a fee
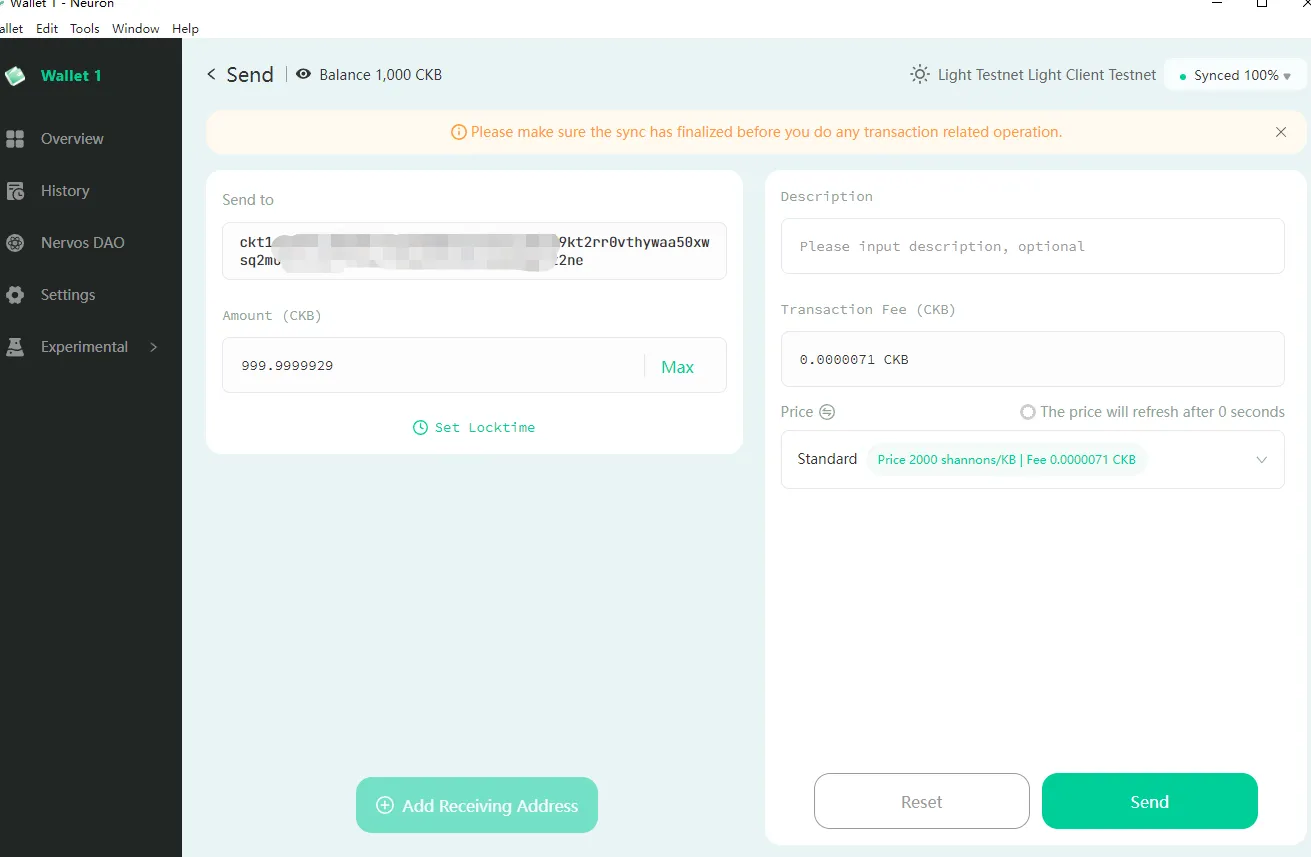
The Send screen splits into the payment itself on the left and the metadata and fee on the right. Neuron builds the transaction from your own cells, so the fee depends on transaction size, not on a fixed tariff.
Daily use · Step 03 — Neuron Wallet Send screen with recipient address, amount and fee settings
Paste the recipient's ckb1… (mainnet) or ckt1… (testnet) address — Neuron validates the checksum and rejects malformed addresses.
Max fills in the largest sendable amount while leaving enough CKB for the fee and the 61-CKB minimum cell capacity.
Description is stored locally in your own history only; it never leaves your machine and is not written on-chain.
The Price selector (shannons/KB) sets the fee rate — Standard is fine for normal traffic, raise it only when blocks are full.
Set Locktime lets you create a time-locked transfer that the receiver can only spend after a chosen date.
Add Receiving Address turns the transfer into a batch payment with several outputs in a single transaction.
04
Deposit CKB into the Nervos DAO
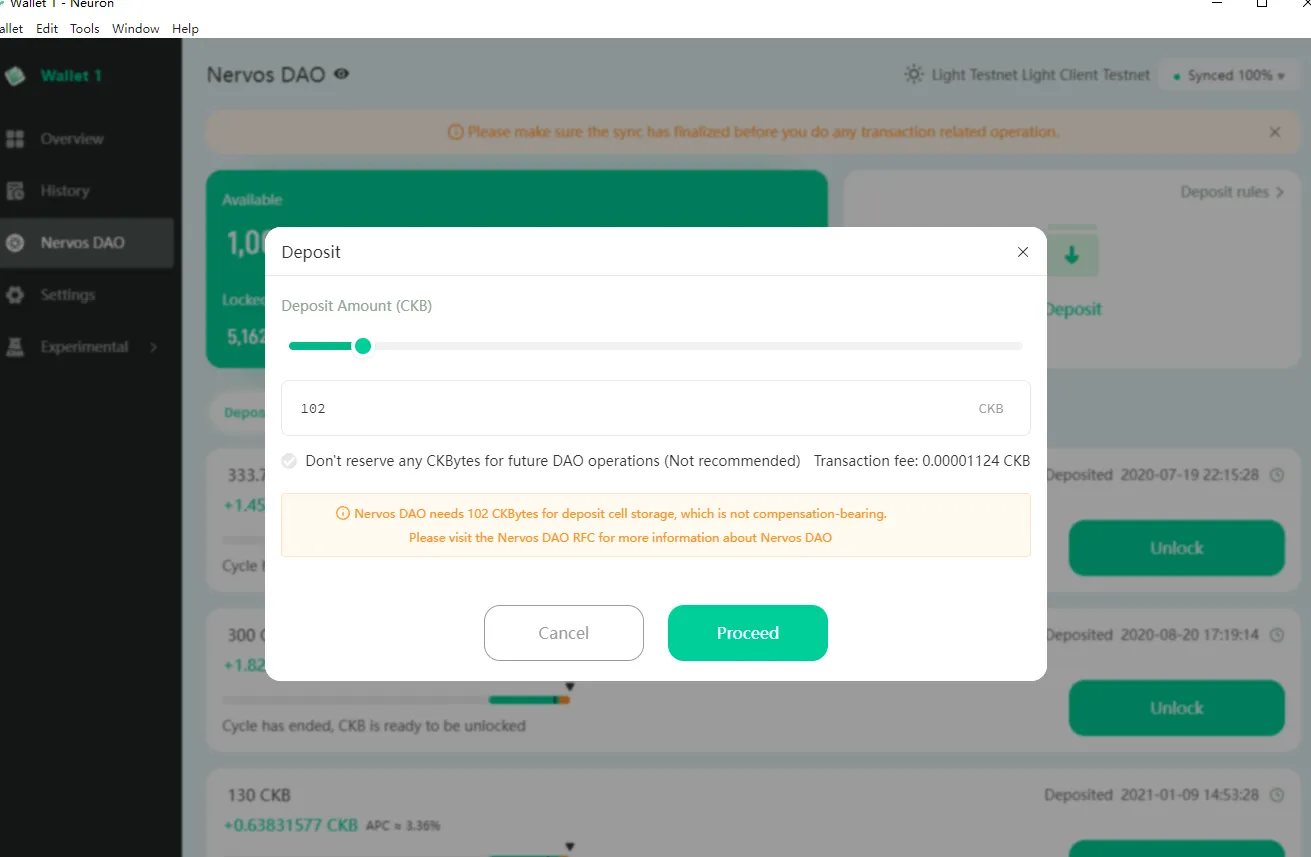
Nervos DAO lets you lock CKB to earn a secondary-issuance compensation that offsets the inflation dilution of holding CKB. Deposits stay non-custodial — the cell is yours the whole time.
Nervos DAO · Step 04 — Neuron Wallet Nervos DAO deposit dialog with amount slider
The slider or the input field sets the deposit amount; the minimum is 102 CKB because the deposit cell itself needs 102 CKBytes of storage.
Those 102 CKBytes are locked as cell capacity and do not earn compensation — only the amount above them is productive.
Leave the reserve checkbox unticked so the wallet keeps some CKB for future DAO operations (withdraw and unlock are transactions and cost fees).
The Available / Locked cards at the top show how much of your balance is free and how much is currently committed to the DAO.
Note:Compensation accrues per 180-epoch cycle (roughly 30 days). Withdrawing mid-cycle means waiting until the current cycle ends, so plan deposits around that rhythm.
05
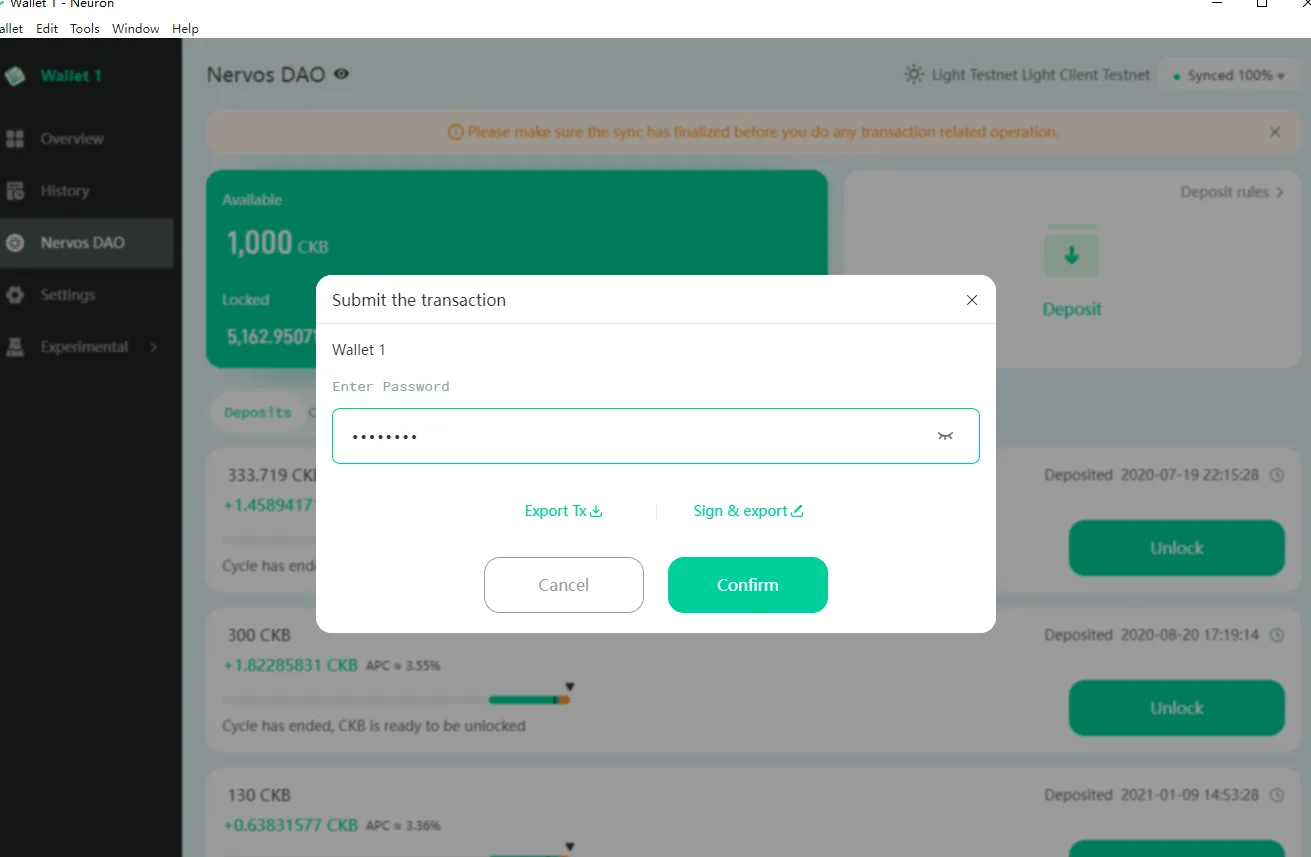
Sign the transaction with your wallet password
Every state-changing action — send, DAO deposit, withdraw, unlock — ends with this dialog. Your password decrypts the keystore in memory just long enough to produce a signature; the private key never leaves the device.
Security · Step 05 — Neuron Wallet password dialog for submitting a transaction
Check the wallet name at the top of the dialog if you keep several wallets in Neuron.
Export Tx saves the unsigned transaction as JSON so it can be signed on an offline machine.
Sign & export produces a signed but unbroadcast transaction — the standard cold-wallet workflow.
Confirm signs and broadcasts to the node; the transaction then appears as Pending in History until it is committed.
Warning:Neuron never asks for your seed to confirm a transaction. If any screen or website requests the 12 words, it is a phishing attempt.
06
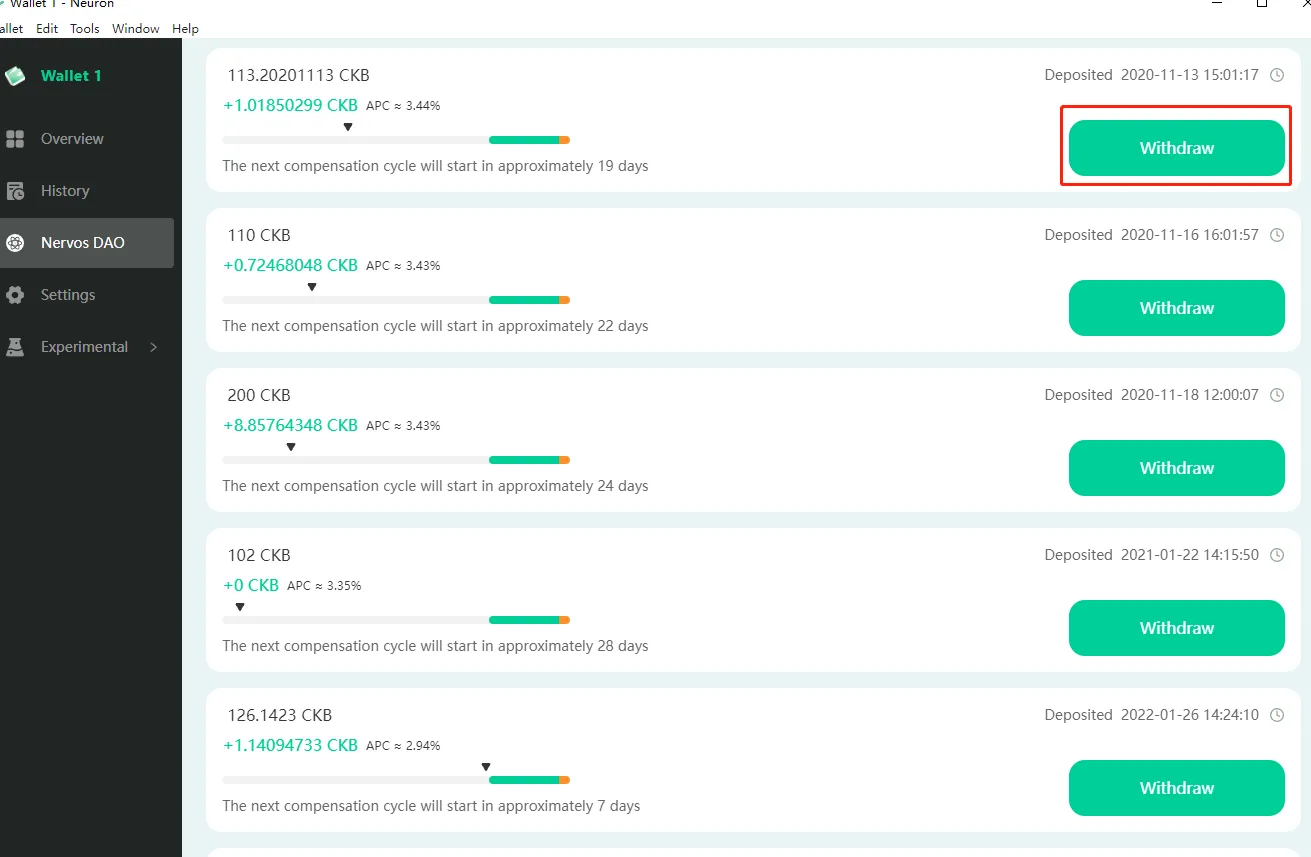
Start a withdrawal when a cycle ends
Each deposit is an independent cell with its own timeline, accumulated compensation and APC estimate. Withdrawing is a two-phase process, and this list is where phase one starts.
Nervos DAO · Step 06 — Neuron Wallet Nervos DAO deposit list with withdraw buttons and cycle progress
Every row shows the deposited amount, the compensation earned so far and the current APC estimate for that cell.
The progress bar tracks the current 180-epoch compensation cycle; the orange tip marks the end of the cycle.
Withdraw at the very end of a cycle to capture the full compensation — withdrawing early forfeits the remainder of that cycle.
Deposits are handled one by one, so you can leave part of your holdings locked while withdrawing the rest.
07
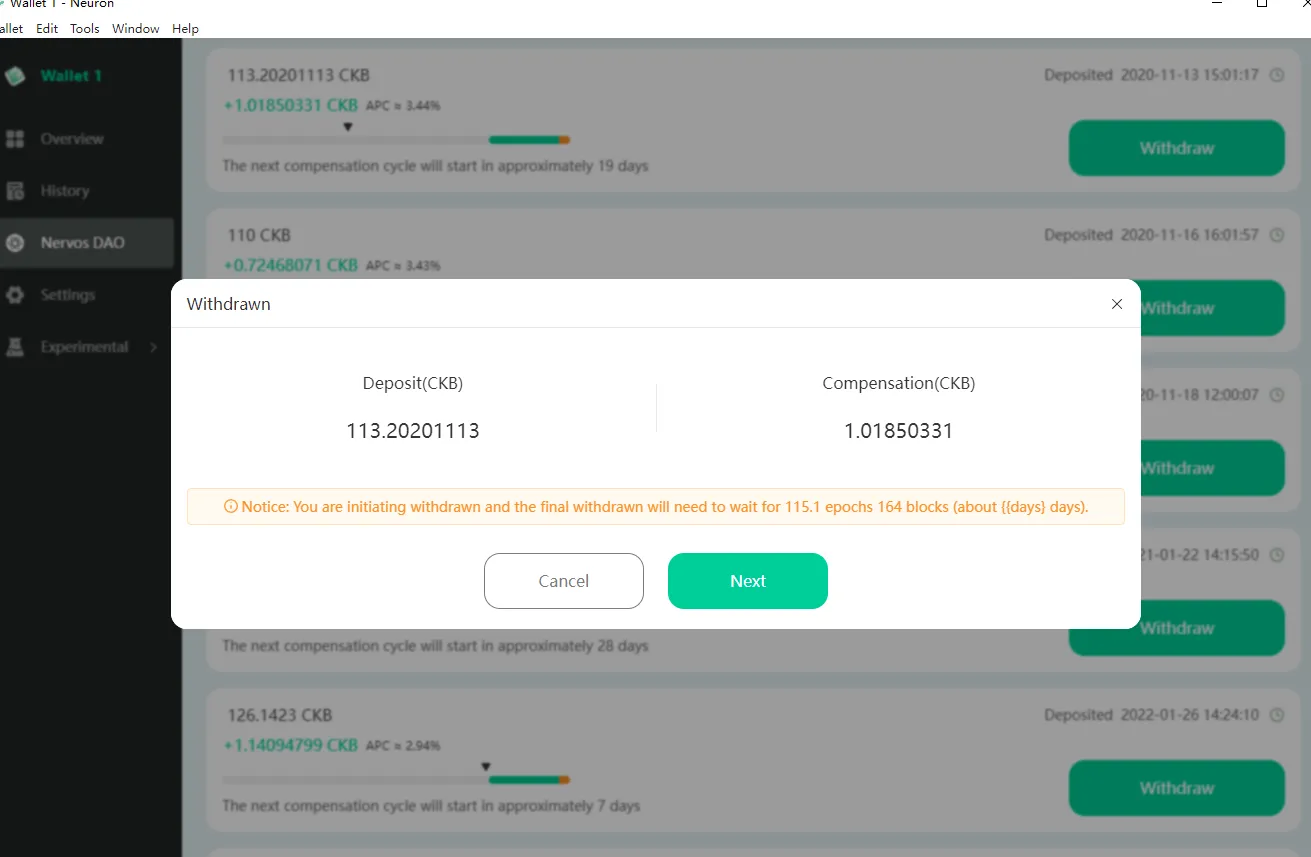
Confirm the withdrawal and wait for the lock period
The confirmation dialog shows exactly what you receive: the original deposit and the compensation accrued. Clicking Next records the withdrawal request on-chain and starts the mandatory waiting window.
Nervos DAO · Step 07 — Neuron Wallet withdrawn dialog showing deposit and compensation amounts
Deposit and Compensation are displayed separately so you can verify the yield before committing.
After this step the cell enters the locking period — up to 180 epochs, roughly 30 days depending on when in the cycle you withdrew.
When the period ends, the deposit shows an Unlock action; that second transaction moves the funds back to your spendable balance.
Keep a small CKB reserve outside the DAO so you can always pay the fee for the unlock transaction.
08
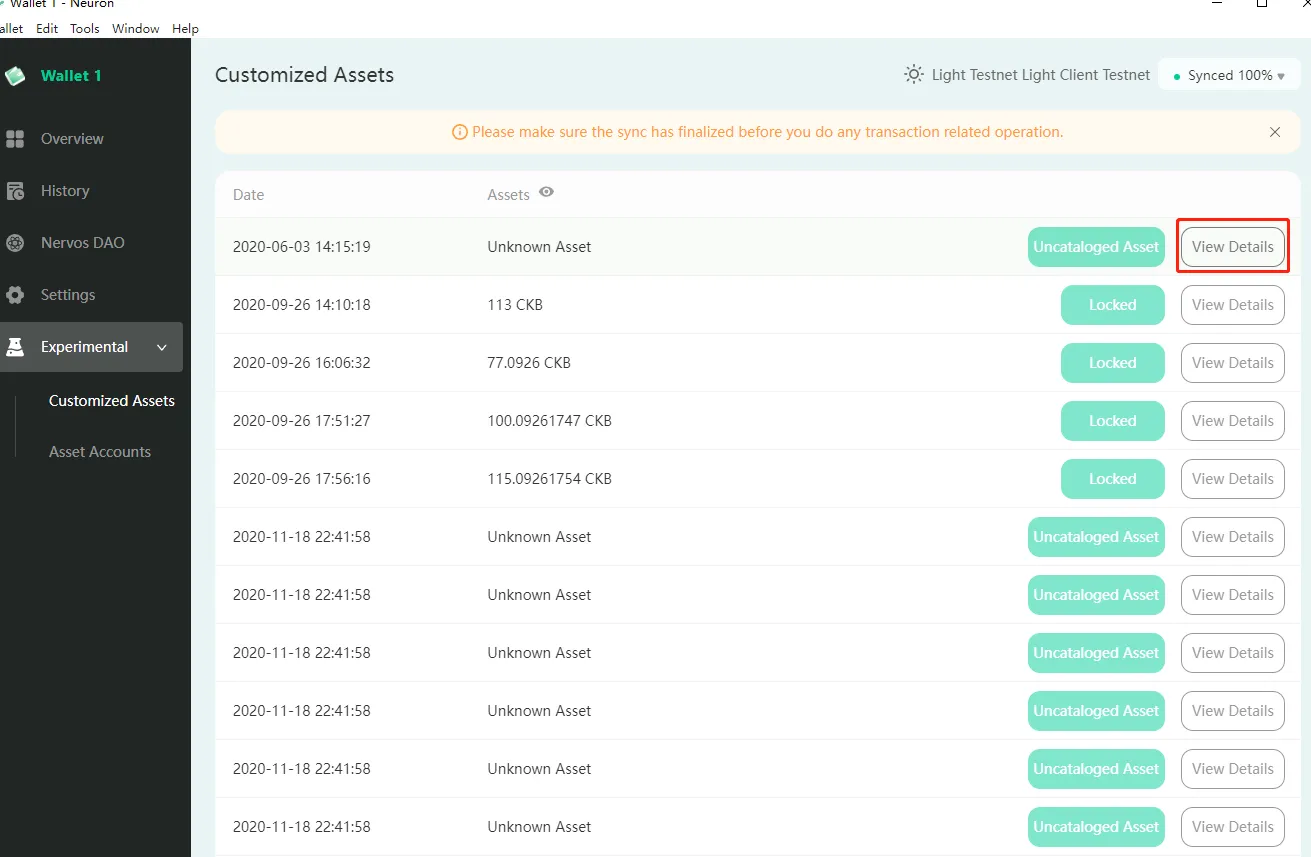
Inspect customized assets and cell details
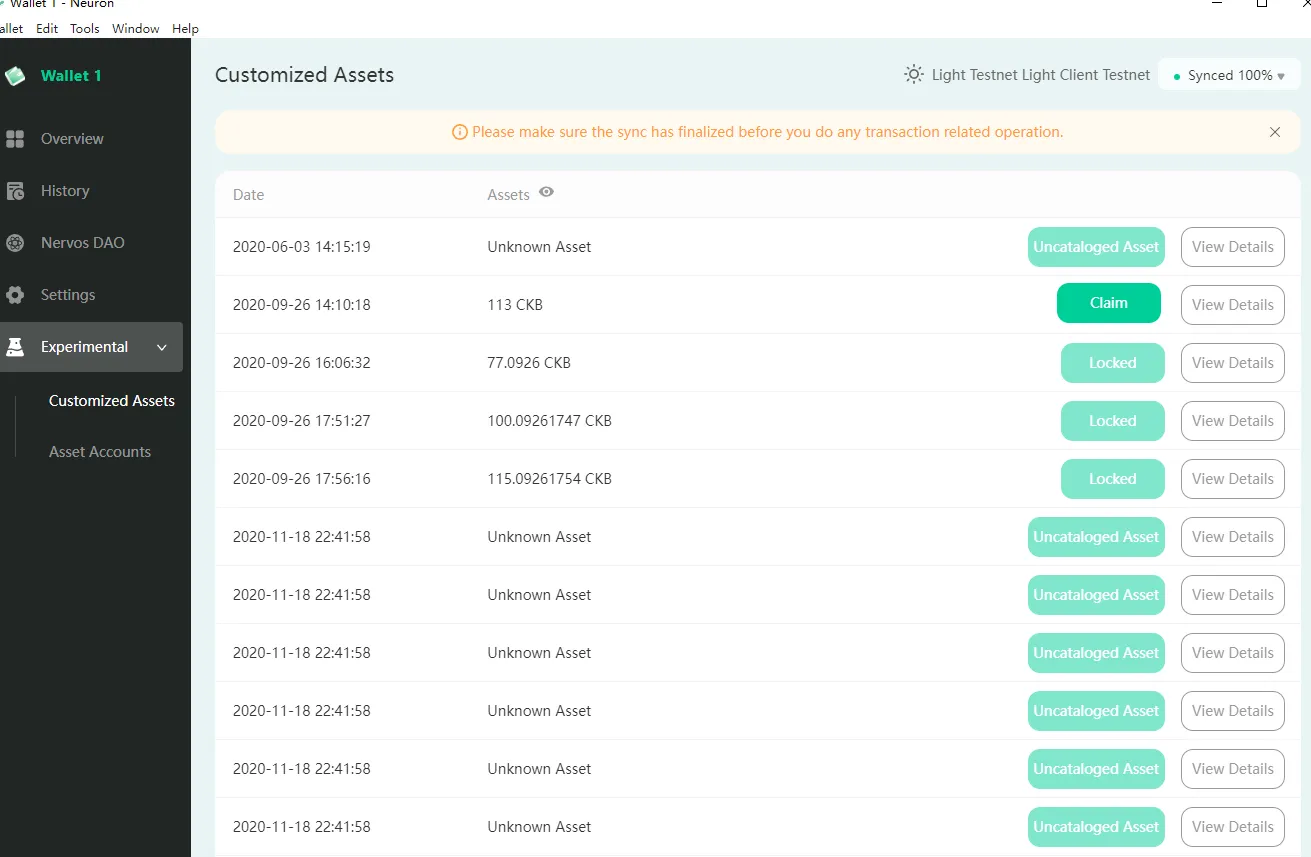
Under Experimental, Customized Assets lists cells that are not plain CKB transfers: time-locked cells, DAO-related cells and unrecognised scripts that Neuron cannot classify automatically.
Advanced · Step 08 — Neuron Wallet Customized Assets list under the Experimental menu
Locked marks cells still inside a locking period — the capacity is yours but not yet spendable.
Uncataloged Asset means the cell carries a script Neuron does not know; the funds are safe but must be handled manually.
View Details opens the raw cell: capacity, lock script, type script and args — useful for debugging or for verifying a received asset.
Asset Accounts, next to it in the sidebar, is where sUDT/xUDT token balances live.
09
Claim assets once they unlock
When a locked cell reaches its unlock height, its badge switches from Locked to Claim. Claiming builds a transaction that moves the capacity back into your normal spendable balance.
Advanced · Step 09 — Neuron Wallet Customized Assets list with a Claim action available
Only rows showing Claim are actionable; Locked rows still have time remaining.
Claiming costs a small network fee, so keep some free CKB available.
After confirming with your wallet password, the balance updates on Overview once the transaction is committed.
Repeat per row — each cell is claimed independently, which keeps the transactions small and cheap.
Note:If a row stays Uncataloged after unlocking, it usually means the asset uses a custom script; open View Details and handle it with the issuing dApp.
Next steps
You now know the full lifecycle: create, sync, send, deposit, withdraw and claim. For node settings, sUDT/xUDT tokens and Ledger hardware wallets, continue with the documentation.